view towards vestibule/front window - looking east
vestibule
... work on the doors starts Monday. All doors need attention, however the front door and respective exterior trim are in extremely bad shape (not to mention to non-existant interior trim). Exterior trim will be sanded and partially replaced... Front door will be sanded, gaps/chips/old hardware holes plugged, sanded and filled smooth with wood filler/bondo, new glass installed, new hardware holes bored and new hardware (including mail slot) installed. Since refinishing for a stained wood finish would require major restoration and reveneering, which is way out of our budget, we are going to keep the trim and door (outside and inside surface) painted (Sherwin Williams "Iron Ore")... we like how it looks painted anyway, so win-win on this one! Vestibule door isn't in very bad shape, so it will be sanded, gaps/chips filled with wood filler/bondo, new hardwared installed, and painted (Sherwin Williams "Dover White").
In addition to the doors, the wood panel fascia and closet door will be sanded and primed for painting beginning of next week...
stair / closet under stair
... we had a bit of a 'failure to communicate' situation with Bo's dad, who is currently working solo on the stairs... As mentioned in a previous post, while demolishing the stair, the newel post and base surround/fascia were discovered to be unsalvagable. We figured out a way to rebuild both, within our budget... however, it appears as though the details got lost in translation... or just blatantly ignored. The first step was supposed to be 'built-in'/wrap-around/enclosed by the vertical base fascia... Instead, Bo's dad took liberty to design, and construct, another option.
... not cool, Bo's dad, not cool... especially since your option looks like ass...
After a bit of heated discourse, we decided to let this slide... we can always do a bit of altering later... it's just not worth the added aggrevation/delay in schedule to rebuild... moving on...
The drywallers have moved in... and they are moving fast... in fact, they are still at the house, drywalling, as I write this... they are on a mission and motivated...
... meanwhile, the stairs are slowly moving along... the quality of the work is phenomenal (shout out to Bo and his dad)..
... the treads are red oak and will be stained the same color as the floor... the risers and stringers are poplar, and will be painted... Sherwin Williams Dover White, of course!
Impressive detailing...
I wish we could afford to have them completely refinish the wood paneling and newel post... however, the cost was astronomical... So, instead, we are just having them sand the wood paneling down a bit, so that we can paint the wood, nice and smooth... Sherwin Williams Dover White... same as the risers and stringers...
... the newel post is posing quite a challenge though... originally, our plan was to sand it down as well, and repaint it... However, in demolishing the stair, which included the handrail and fascia for the base (both unsalvagable), the newel post lost bits and pieces of itself... and to restore it is sadly out of our budget...
... since it is an integral piece of the wood paneling, it's not going anywhere... So, the new plan is to encase it in red oak and construct a newel post around the original... we'll see how that creative endeavor goes...
Our other little creative endeavor is a sistered joist/beam that straddles both the dining room and living room. The ceiling in the dining room is a good 12" to 18" or so lower than the living room... alas, the now visible joist/beam, which previously had been nicely concealed in the ceiling. The drywall guys took it upon themselves to detail how the drywall wraps the beam/beam expression in the living room...
Insulation took about a day and a half/two days to install... days 10 and 11. Since we live in a very narrow house, and since in the living room, both long walls are party walls shared with our neighbors, our overall insulation value is quite good... the only two walls that needed to be beefed up (6" with combination rigid and batt insulation) were the short walls - the east wall (front picture window/entry door wall) and the diagonal northwest wall (small window looking into the gangway). As for the long party walls, our primary concern was acoustics. Since we were trying to maximize our narrow space constraints, we placed the 2x4 framing in long direction vs the typ. short (deeper) direction... We then placed 1" thick rigid insulation b/w the framing strips... we did the same thing upstairs and it has worked well.
On day 12, yesterday, Jose and his crew finished framing out the firebox with cement board and got quite a bit of the drywall up... and Bo and his crew started on the stairs.
I was expecting to come home to find the treads and risers missing, however the rest of the staircase (stringers and surround) intact... that was not the case... except for the newel post and wood paneling/closet door, and a couple of random surround pieces we found stashed away in our living quarters beyond the plastic, all elements of the stair were GONE...
... wow. That was unexpected... Everything got cleared up this morning... stringers will be rebuilt today, in addition to starting the treads and risers... and hopefully we'll be able to get back upstairs via stairs by Thursday...
... but... let's get back to the firebox/fireplace. As I mentioned in a previous post, rebuilding the existing fireplace would have been ideal... it was compact, wood burning... a true fireplace. Unfortunately our budget did not allow for such, so if we wanted to have a fireplace, our only option was to install a ventless gas firebox... since fireplaces are cozy and a must in an 1880s home... we figured it should be okay... the firebox could be partially installed in the opening of the existing/old fireplace, saving on precious floor space... and we'll make it look as built-in as possible... even though it is gas... well... the firebox could not be installed in the existing opening, not even partially... so... as for making it look 'built-in'...
... fairly straight forward, fast and without glitches. Hallelujah.
Our lighting plan, and selection, was driven by budget... therefore, we opted to go with Halo recessed can lights and Lutron switches (courtesy of the Home Depot). We did splurge a little on the trim... instead of baffle, most of the fixtures will have an eyeball trim piece... we then can direct the light at artwork and such and get all archi-artsy-fancy-shmancy... class.
For recessed cans, Juno would have been the preferred choice, but it priced out at twice the cost... the ideal lighting plan involved hidden cove lighting (no one likes a swiss cheese ceiling), a few 3" halogen can fixtures, and a couple of pendants... however, that priced out at five times the cost... we had discovered long ago, when we first started renovating, that our 'ideal' plan/design will never be an option, so switching over to the el cheapo option wasn't too heartbreaking, although it did renew my motivation to play weekly Powerball.
Since there is still a lot of construction dust to be had (drywall, wood floors, etc.), the electrician put in some temporary switches... since the Lutron switches are somewhat pricey, better to preserve them a bit... He also managed to locate a new mail holder for us too...
On days when there are (multiple) workers at the house, running back and forth from the living room to the basement, using noisy power tools, creating and kicking up dust, we take Charlevoix to Dogone Fun for the day...
We take her there for boarding whenever we go out of town, in addition to grooming, whenever she needs some serious shed management or a good haircut... They offer 'doggie daycare' and she loves it, although now that she is in her golden years, she a bit more lazy than she used to be... they have these webcams set up so that you can observe the dogs in the various playlots during the day... so, I checked in on Charlevoix, from time to time, to see what she was up to...
... apparently she's got a new boyfriend... Sammy, the Newfoundland... I met him the other day... he's cute.
The power came back on in the middle of the night... oh happy hum of power tools! I love me a power outage as much as the next person... strike that... clarification... I love me a summertime power outage as much as the next person... winter = no heat, and that's not cool... but let's get back to the summer power outages... ... no tv... no lights... sitting outside, watching the lightening bugs light up the sky as the sun sets... the smell of a freezer full of barbequed meat wafting from every single neighbors' yard... it's kind of fun... However... when you are in the middle of gut-rehabbing, while on a tight schedule... well... during those times... I'm not feeling the love.We were lucky... there were many people without power for a couple of days... that was one bad ass storm front... hurricane force winds... knocked down trees all over Chicago... I always get sad when I see a knocked down tree... ... I digress... Day 6... construction... it was all about tuckpointing... and a little bit about framing. There wasn't a great amount of tuckpointing to do... but quite a few patches here and there...
... the attention areas were primarily around the ceiling joists... in addition to a few areas around the windows and chimney bump-outs...
Originally, we were planning on furring out all the walls with new 2x4s, placed along the original furring strips... partly for insulation purposes... but mostly because the original furring strips are flush with the outer edge of the foundation wall... the foundation wall is slightly higher than the subfloor, so instead of raising the subfloor, it's easier and more cost-effective to add additional framing/furring to the walls, so that the drywall will rest on the new plywood subfloor, rather than the foundation wall... however, the south wall is proving to be a problem...
... the front door frame requires that the drywall be secured to the original furring strips... if not, it will overlap the door frame by a few inches... so... that means that the top of the foundation wall in the vestibule must be chisled down so that the new subfloor meets the original furring strips = lots of work. Jose's crew managed to start a bit of framing, however a couple items need attention...
... the previous owner of the house took out all the radiators and put in forced air heating... as a result, we have these poorly planned ducts traversing in the most inconvenient and illogical locations, one being between the front door and the large front window. The duct is enormous, and therefore, has a large radius when it turns to feed the second floor register... that radius has to decrease so that the box-out framing for that duct can decrease... it eats up way too much valuable space in the living room. The second item is the register near the vestibule door... needs to shift a bit to accomodate the straightening of the vestibule wall.
Week from hell... both B and I have deadlines at work... B has the Chicago to Mackinac race this weekend... construction schedule is very tight... electrician starts Wednesday, and he's squeezing us in, so we can't push his start date... Jose and his crew still have to do a bit of tuckpointing on the interior, and finish furring, in some cases framing, the walls, so that the electrician has something to which to attach the conduit...
... so, of course, at 8:30am a storm front would have to blow thru, with winds of 85mph, knocking out power to over half a million homes in Chicago, including ours... and of course ComEd would continue to notify us all day that they don't have an estimated time for power to be restored... could be 12 hours... could be 48 hours... could be 72 hours...
Jose and his crew are returning tomorrow morning with a generator... and ass will have to be hauled in order to be ready Wednesday for the electrician...
The day was not lost... the sun came out and chimney master Giovanni showed up with his side kick Cesar, plus 2 other guys (who kept changing the subject when I asked them their names... should I be concerned???), and built a brand new masonry beauty...
... Giovanni constructed a little tent around the chimney, to (somewhat) help provide some shade... given it was about 95 degrees today on the street, it about 195 degrees on the roof...
... this is Cesar. He's my new best friend... he is the happiest man... he doesn't speak much english yet I managed to have a 30 minute conversation with him...
... he gave me a hug after they packed up and were ready to go... the man radiates happiness.
We still will have to add caps atop the chimney stacks... there are four total within that one chimney... two feed our house and two feed our neighbor's house... we'll deal with those in August (Giovanni is going on vacation for three weeks starting this Thursday... I want a three week vacation... ).
Given the power outage, plus a few other surprises, tweaks, and add-ons, the construction schedule has been revised a bit:
The floor joists are level and the new subfloor is in...
... the fireplace is partially installed... the gas line is in, and the framing is partially complete... tomorrow the firebox will be hooked up to the gas... burner will be installed once the dusty work is complete (drywall and wood floor installation).
View looking east... look at that new subfloor...
... I kind of like the living room without the vestibule... it seems SO much larger and more open. Unfortunately, we kind of need the vestibule... even though we will be refinishing the front door, its insulation value is not, nor will be, that of a new door... and we can't afford a new door (given shape and size, the door would have to be custom made... estimates came in ranging from $8K to $15K... yes, you read that correctly)... so... In addition, we have the Charlevoix factor... she turns into Cujo when the mailman drops the post thru the mail slot... the closed off vestibule keeps her away from the mail slot and away from the mailman's hands... Finally, the vestibule niche will provide a small area in which we can hang coats and deposit shoes... ... so, the vestibule stays...
SO... you know how I previously mentioned our concern about that possibly collapsed chimney, due to the debris we found in the demolished fireplace? Well, since the fireplace guy was at the house, installing the fireplace, I had him take a look at the chimney... The good news was no collapse occured during demolition. The bad news... the chimney was about to collapse due to age and water infiltration...
... this explains why we were getting water damage down the furnace flue stack and all that salt residue/corrosion on the basement masonry wall...
... could remove chunks by hand... very ugly situation indeed...
... see that bubbling? It's buckling...
B was working on the boat, so I gave him a call with the news... he didn't believe me at first, but after I emailed the photos to him, he called back and with a quiet, somber voice sighed, "... we need to rebuild the thing... sh*%."
The chimney sub took pity on us and gave us a bit of a price break (I think this may be because while at our house, he got some additional work on our neighbors house... turns out she has a tree growing out of her chimney/parapet... I kind of felt better after hearing that news... does that make me a bad person???). Old chimney has been knocked down and the new one is being built tomorrow....
I have a feeling this isn't the end of the chimney drama... we will have to have the furnace guy inspect the flue/liner... do I dare be optimistic and hope for the best? I'm guessing no... ... and you wonder how I became so cynical....
SHOCKINGLY, all the floor joists are in great shape... unbelievable, I know!
There are a couple of minor repair items that surfaced: + the framing around the light well exterior window needs attention (a bit rotted) and + a few areas of the masonry walls need a bit of tuckpointing
The floors have definitely sagged/settled a bit over the years, so leveling will be needed...
... but overall, the centurian floor joists are looking good!
Under each fireplace tile hearth, we discovered thick concrete beds/slabs... those have been taken out...
... while demo-ing the concrete, some of the framing/blocking got knocked out, so that will need to be repaired...
The closet under the stairs has also been demo-ed, revealing the structure of the stair...
... and as suspected... new treads and risers are needed asap...
The vestibule walls are now gone, along with the tile floor...
... and under the tile floor, there was also a thick concrete bed/slab...
... in addition to two (2) layers of plaster walls, turns out we had not two (2), as previously mentioned, but three (3)... yes, T-H-R-E-E... layers of plaster ceilings... so, yesterday was devoted to finishing up ceiling demolition.
The good news: + all of the 120+ year old beams/2nd floor joists are in great shape...
The bad news:
+ during ceiling demo, the plastic around the stairwell fell + when the plastic fell, it also ripped + the demo guys kind of tacked the fallen plastic back up with 3 nails (vs the 300 staples we had used)
+ 3 layers of plaster ceilings = epic amounts of plaster dust + dust travels
We came home to horrific amounts of dust covering not only the area under construction, which was expected, but also back half of the first floor that isn't under construction AND the entire upstairs...
... if yesterday's dust were a movie, it would have been rated NC-17...
I didn't take any photos, since I spent the night cleaning (4 1/2 hours and not even close to clean)... ... but, I thought the following clip (a favorite 80s old-school classic) sums up our daily chaos perfectly...
The front bay window is in good shape and so it stays (phew!)... trim will go though...
The entry vestibule... doors are to be refinished...
We suspected there was a fireplace covered up near the front window... and there was... and it's collapsing... only partially though, so I guess we got lucky... no matter... given we can't even afford to restore one fireplace, the second one is not happening...
The primary fireplace... where we are installing a new ventless gas firebox (it's killing me, but no wood-burning turn-of-the-century marble fireplace charm is to be had... unless we win the lotto in the next two days)... ... note the fully collapsed masonry inside the fireplace? ... now THAT is more our style... none of this partial deteriorating business...
... that white film on the floor? Dust... dirty nasty gritty demolition dust (primarily from plaster)... and yes, it has managed to infiltrate the entire house, despite the plastic... which we knew it would... but, the plastic did help keep it under control a bit...
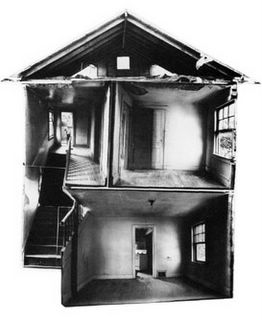
Note the ceiling... we had two... the first ceiling (deteriorating and very poorly installed drywall) was slapped onto the original plaster ceiling (which is in horrid shape as you can tell from the photos)... first ceiling is gone... original ceiling still to go...