So far, so good! Today, wood flooring was installed in the middle (smallest) bedroom and in about 1/2 of the corridor. I cannot wait to see how the rest of the upstairs will look once the flooring is installed! So far, so good! Today, wood flooring was installed in the middle (smallest) bedroom and in about 1/2 of the corridor. I cannot wait to see how the rest of the upstairs will look once the flooring is installed!
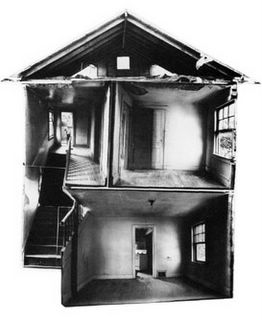
 Even though we installed a new subfloor (atop the old subfloor) throughout the rest of the upstairs (exception being the back bedroom), we opted to try and work with the existing subfloor in the master bedroom. It appeared to be in relatively good condition... Well, the floor in the bedroom was not level enough, plus it was approximately 1" lower than the corridor subfloor - a difference significant enough that even the best of thresholds couldn't transition smoothly. So, we ended up installing a new subfloor.
 ... and an insulated ceiling too! Let's give it up for greenboard!
 The wood flooring strips were delivered early Wednesday morning, in order to have about a week to acclimate prior to installation. As mentioned in a previous post, we opted to go with white oak. We are still deciding on a stain color. Rob, the owner of the flooring company, delivered all the wood by himself. His helper got stuck on another job. 34 bundles. 34 trips up the stairs. ... and I just sat there, drinking my vanila flavored Taster's Choice Instant Coffee, watching, commenting every once in awhile, WOW... THAT SURE LOOKS HEAVY... SORRY ABOUT THE HEAT, WE DON'T REALLY HAVE AIR CONDITIONING... YOU MUST BE READY TO PASS OUT... YOUR FACE IS MIGHTY RED... ONLY 17 MORE BUNDELS TO GO! YOU'RE ALMOST THERE! ...YOUR FACE IS REALLY RED NOW... SO, YEAH, MAYBE I'M JUST GOING TO GO HANG OUT WITH THE DOG WHILE YOU FINISH UP...
  In addition, electrical was run for the strip light that will be located above the sink and medicine cabinets:
 Today, the rest of the backer board will be installed and hopefully, some of the drywall. We're trying to get as much of the drywall work done before the flooring installation begins... I think we'll get the walls done, but we may have to tackle the ceiling after the installation of the wood floors. I just hope the floors don't get trashed...!
 I love a clean house. That is the one thing about this whole renovation process that has been driving me nuts... constant dust EVERYWHERE. I spend an entire weekend cleaning, only to come back from work on Monday to find the house dirty once again - sawdust, drywall dust, insulation dust, Charlevoix dust... Soon the dust will settle, well, at least until construction on the first floor begins. As soon as it does though, I'll be able to love a clean house for longer than just 24 hours once again... I cannot wait. In the meantime, I thought I would share Real Simple's Periodic Table of Cleaning. I thought it was a fun graphic tool, for a boring routine such as cleaning, even though most of the elements listed are pretty obvious. What they should REALLY come out with is a Periodic Table of Home Maintenance - a checklist and calendar of home upkeep and repair. I'll have to contact Real Simple about that...
 Plumbing has been roughed-in for the tub and shower (photos above and below)
 We have also framed out the tub surround, shower shelf and ductwork. The existing (and only) air supply grille happened to be located directly under the tub surround. Originally, we planned to reroute the duct, however that got very expensive and many floor joists would have needed to be cut. Since that was not an option, we decided to just run the existing supply vertically, and locate a grille in the wall. Not the ideal solution, but it works.
 The tub faucets have been located and are being tweaked, in order to leave room for tile installation.
 We brought the tub upstairs and it will be secured into place today. We will then have two bathtubs in the house. TWO. Currently we just have one very tiny shower, which is fine, but I just really miss taking baths.
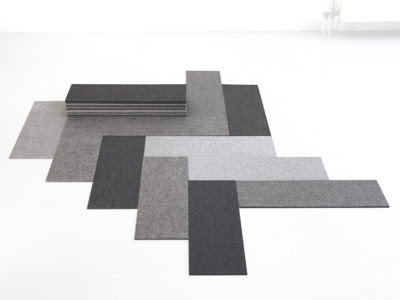
 We have been researching flooring uptions for the upstairs since last October...
  The handrails have been re-installed. Phew. This was not an easy task, given the scalloped point on which the handrails rest, at each step. We ended up just using a mortar connection at each scallop and at the handrail base, which rests on the bottom step. The original plan of installing steel rods, as reinforcement, would have cracked the handrails. Luckily, the handrails are heavy enough so that even with just a mortar connection, they are quite secure.
 Current status of the master bathroom... progress to be noted is located on the left side of the photo above. The water supply for the sink is in and the outlet that will be in the medicine cabinet has been located. Running water supply for each faucet and installing the sink waste pipe is next...
 We had previously ordered the tub (Devonshire by Kohler - acrylic, drop-in, inexpensive and purchased thru FixtureUniverse.com), shower pan (Swanstone - also acrylic, inexpensive and purchased thru FixtureUniverse.com), and the rough-in valves and trim pieces for the tub, shower and sink faucets (all Hansgrohe purchased thru K&B Galleries, in the Merchandise Mart). All are currently located somewhere in our living/dining/sleeping room. Today I ordered the sink. We opted to go with Vero, by Duravit, wall mounted, no counter (cheaper and looks good):
 We should be getting it in about 4-6 weeks... no rush though, since I don't think we'll be installing it until at least October, possibly November. This year, 2007... just in case you were wondering... (By the way, the Hansgrohe sink faucets we ordered are almost identical to the ones in the photo above... Uno.)
 Yesterday, Jose and his crew removed the formwork from the stairs, repaired the terrace columns and patched the guardrail stiles. As you can see in the photo below, one stile is still missing - only its base remains attached to the guardrail. We may just end up leaving it that way. Given the stiles' unique shape, we'd have to create a mold in order to construct the stile, and that may be more trouble than it's worth. The house IS over 100 years old... it's bound to have a little flaw, er, rather character, here and there...
  Jose and his crew also finished pouring the sidewalk steps. They came out okay...
 ... not perfect, but okay... they work... and look significantly better than before.
  Tomorrow the guys return to re-attach the handrails. Previously, they were just kind of sitting atop the stairs. Even though it took six guys to lift the handrails, it only took two of them to push the slabs of stone onto their sides. SO, we decided the way to go is to drill a stainless steel rod, about 1/4" in diameter, into the stair and into the stone handrail, at the point which rests atop each step. Hopefully the stone handrails don't crack...
  ... yes, I climbed that ladder, in a dress, when I got home from work this evening. It didn't go too well. I'm blaming the sand pile. Bad footing.
 The stone and brick walls, serving as supports/bearing walls for the original stairs, turned out to be in worse shape than we thought. Both need major tuckpointing. Originally, we thought the stones, located in these walls, were quite structurally sound and solid. Turns out, this is not the case. The stone gets more veneer-like (thinner and smaller) in size, as the wall progresses forward, towards the sidewalk/street. So, in order to provide the necessary additional support, the cavities between the brick and stone walls will be filled with a mix of stone 'rubble', compacted dirt, concrete and rebars, which will tie into the new concrete stairs.
 Our front yard has been converted into a giant sand pit/concrete staging area. I'm so glad we waited to landscape...
 Jose and his guys managed to remove the handrails without any damage, which was NOT an easy feat. It took 6 guys to remove these solid chunks of stone. Already we have started discussing how to reattach them... I really hope it works. They are gorgeous and it would be a shame if we couldn't use them.
 We're going to try and pulverize the old steps into sand and stone chips, to mix into the concrete, along with the aggregate. We thought it would give more texture and 'color', even though we are adding a bit of pigment to the concrete mix already. The only concern is that the stone may compromise the strength of the concrete... it's very soft. We weren't planning on using much, but still... we're going to do some test samples and see how they turn out.
 In addition to discovering the stone's true color, all chipped and semi-loose chunks of stone, still clinging onto the steps, were washed away, confirming what we already knew - we need new stairs.
  ... and so the work begins! Unfortunately, even though ideally we would restore the stairs and terrace to their original glorious state of being, we don't have the funds. So, we are going to try and salvage the original handrails, we are only patching and repairing the terrace and guardrail, where needed, and we will be rebuilding the stairs in concrete. The existing concrete walkway will be broken up and we will install paver stones instead. Then, we have to figure out how to landscape the yard...